WordPress is the most popular content management system (CMS) and powers almost 40% of the entire web! You can build any type of site imaginable with it and it is easy to get started without knowing how to code.
So, let’s get started with “how to build WordPress sites” with the following 3 steps.
Getting Started With WordPress
Before you can begin building your first WordPress site, you need two things; a domain name and hosting. A lot has changed since I was first introduced to WordPress back in 2011 including the types of hosting offered.
Step 1: Buying A Domain Name
Domain names vary in price depending on the extension (.com, .net, .org, etc), but you can typically expect to pay anywhere from $10-$15 per year, maybe less, providing it is not a premium domain name. You can purchase a domain name from a “domain name registrar”.
What Is A Domain Name?
A domain name is the address that allows users to access your site (i.e. example.com) and is found in the address bar of your browser.
Computers use IP addresses which are a series of numbers that are difficult for humans to remember so those numbers are associated with a domain name; an easily identifiable website address.
Recommended domain name registrar: Namecheap.
You want your domain name to give people an idea of what your site is about before they have even visited it.
Take this site for example. My domain name is wpexplaind.com which should have given you the idea that this site is all about WordPress.
Here is a full guide on what a domain is and where to purchase one.
Step 2: Sign Up For Hosting
After purchasing a domain name the next step is to sign up for hosting.
Nowadays, many companies are offering what they call managed WordPress hosting; hosting environments that are built specifically to handle the needs of a wordpress site.
I recommend Siteground for a number of reasons, one among them is that they are affordable. Learn about all of the benefits of choosing Siteground in our hosting review.
Siteground is a recommended managed wordpress host.
Picking the right host can have a dramatic impact on your site performance; and is something you must consider.
If you choose a managed host like the one I mentioned above, WordPress will be pre-installed for you; one less thing to worry about.
Here is a full guide on what hosting.
What Is Hosting?
A website is a collection of files and folders. Those files and folders are stored externally on a hard drive which are then served to the public. Your hosting server is where all of the files are stored that make up your website.
When someone types in a domain name in the address bar of their browser, that browser goes to the server, retrieves all the files pertaining to that page and then renders those files for the end user to see.
Now that we have our two prerequisites for building a WordPress site out of the way, there’s only one thing left to do to take it live; proceed to step 3.
Step 3: Changing Your DNS
If you took my first two recommendations, (1) using namecheap to purchase your domain, (2) and Siteground as your host, the next step will be relatively easy; pointing your domain name to your servers, otherwise known as changing your DNS (domain name servers).
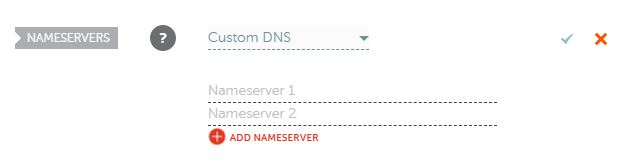
How To Change Your DNS In Namecheap
- Copy the name servers from your hosting account (your nameservers will be located in “Site Tools” and will look something like the following: ns1.giow6104.siteground.us ns2.giow6014.siteground.us)
- Login into “Namecheap”, find your domain and click the “manage” button.
- Scroll down to “nameservers” and select “custom DNS” from the drop down. (it will look something like the image below)
- Paste in both nameservers that you copied from your Siteground account (one on each line)
- Click the green check mark
It will tell you that it can take up to 48 hours to propagate, but it usually happens within 30 minutes. You now have created your first WordPress site. The only thing left to do is customize it.
Here is a full guide on what DNS is and how to set it up in Namecheap.
Configure Your Settings
Now that your site is live, you are going to want to adjust a few settings like changing your permalinks and time zone, setting your homepage, and installing a theme.
Your permalinks affect the link structure for your site. Luckily, changing them is easy. This is good for SEO (search engine optimization) as well as being user friendly.
Let’s being by logging into your site.
Your login page will be located at yoursitename.com/wp-login.php (replace “your site name” with your actual domain name.)
How To Change Your Permalinks In WordPress
From your WordPress dashboard, hover over settings and click on permalinks (it should bring you to a page similar to the image below). Set your permalinks to “post name” and click “save”.
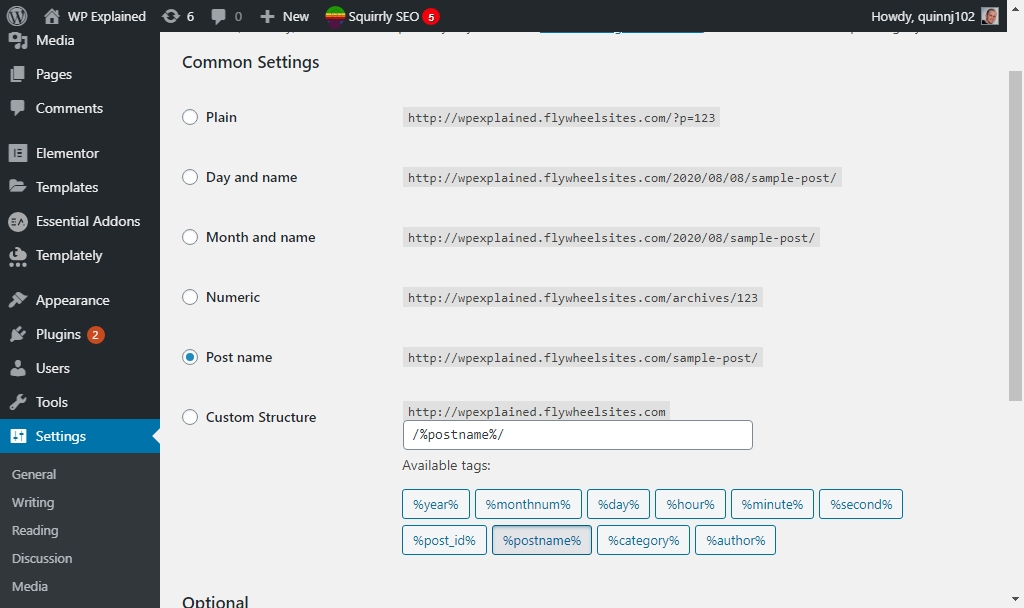
If you look at the address bar for this post you will notice that the URL is wpexplaind.com/how-to-build-wordpress-sites/. That is because I set my permalinks to “post name”.
By default WordPress will display all of your posts on the homepage, but that can easily be changed.
Changing Your Homepage
If you would like to create a custom homepage and have your posts displayed on another page, you must first create two pages; one for your homepage and one for your posts.
You can name them whatever you like. (i.e. “Home” and “Blog”)
Steps To Change Your Homepage
- Create and publish two pages (hover over “pages” and click “add new”, give your page a name and click “publish”. Do this once for your homepage and once for the page you want to assign your posts to.
- Hover over “settings” and click “reading from the sub menu.
- Select “static page” from the drop down menu and then select the newly created page that you want to assign as your “homepage”.
- Do the same for your “posts” page
Next, you may want to change your timezone to reflect where you live.
Setting Your Time Zone
To set your time zone, you must first know the UTC for where you live. To find out just do a simple Google search for “UTC and the state you live in”.
Once you have figured out your time zone is, simply go to your general settings in your WP dashboard and scroll down to where it says time zone; select your universal time from the drop down.
Click “Save”.
Install A Theme
WordPress comes with the default theme pre-installed, but you can easily change that by navigating to appearance> themes > add new.
From there you can search the repository for thousands of free themes or upload one you have purchased.
If you need more information read our post “how to install a WordPress theme“.
Add Additional Pages
Create and publish some additional pages. Every website should have an “about” page and a “contact” page at the very least. You may also want to consider creating some legal pages.
Examples of Legal Pages
- Privacy Policy
- Disclaimer
- Terms and Conditions
- Cookie Policy
You can use a legal page generator like Terms Feed to help you with the creation of these pages.

Select which type of page you want to create, fill out the form with all of your information and the generator will do the rest.
Generate each type of page you need and copy and paste it into the WordPress editor.
Next Steps
Now that you have learned the basics of getting started with WordPress, you should build out some pages. You can either use the block editor or a visual page builder like Elementor to style your pages (no coding skills required).
If you choose to use Elementor you can do things like build out a custom header and create a single post template to make your site more visually appealing.
Or you may want to start a blog.
Summary of How to Build WordPress Sites
In this post you have learned everything you need to know to build and launch your first site. To recap, it only takes 3 steps:
- Purchase a domain name
- Secure hosting
- Change your DNS
Recommended domain name registrar: Namecheap
Recommended host: Siteground
If you are feeling stuck and need help, feel free to join our Facebook Group or leave a comment below.