Before you can learn “how to install a WordPress theme” you must first have the WordPress core installed on your host.
What is a wordpress theme?
A theme is a collection of file templates used in conjunction with the core CMS (content management system). Your theme determines the layout and style of your content.
There are many themes to choose from; some are free, some are paid. Choosing a theme is not always so easy.
If you need help choosing a theme, read our post about the “Top free wordpress themes”.
How to Install A WordPress Theme
There are a couple ways to install a WordPress theme; the easiest way is from within your dashboard. You will need a domain name and hosting before you begin.
Required tools
- Domain name (.com, .net, .co, etc.)
- Hosting
Total cost: USD 18.87
Duration
Total time: 5 minutes
Step 1: Login to your dashboard

login to wordpress Visit yoursite.com/wp-login.php (replace “yoursite.com” with your domain name) and enter your login credentials; username or email and password.
Note: “Dashboard” is another name for admin area
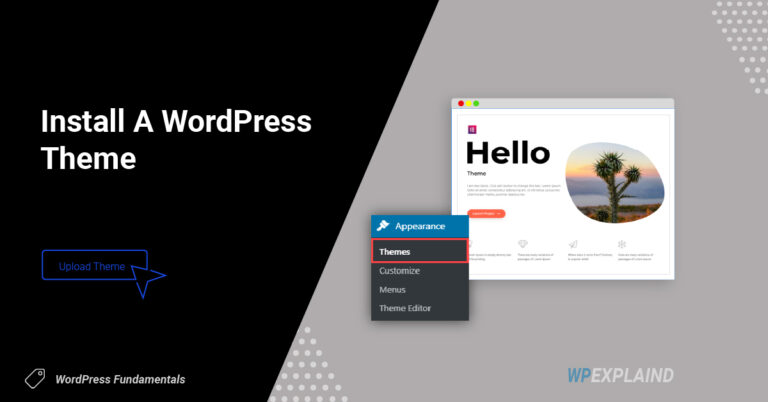
Step 2: Navigate to appearance > themes
The appearance menu is located on the left hand side in your WordPress admin area
Tip: Hover over it to reveal the “themes” submenu.
Step 3: Add your theme

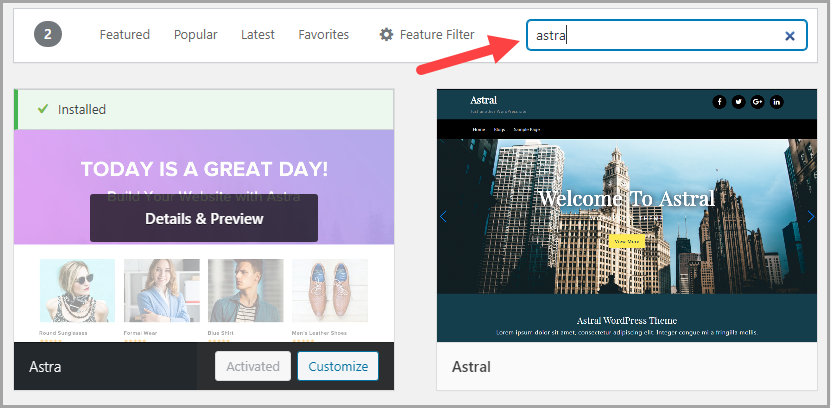
Search for desired theme in the WordPress repository Click the “Add New” button to add a new theme. You will then have the option to search the repository or upload a zip file. Search for your desired theme using the search box.
You can also filter themes by featured, popular, latest, favorites, and the feature filter by clicking any of the links shown in the image above.
Tip: Premium themes will need to be uploaded via a zip file which we cover later in this tutorial
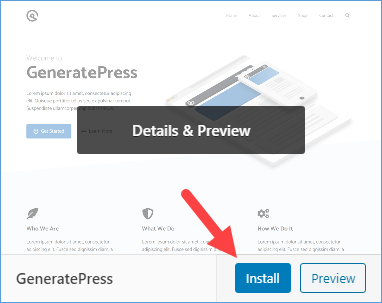
Step 4: Install Your Theme

Install and activate Once you have found your desired theme, hover over it and click install.
Tip: There are many high quality free themes available in the WordPress repository.
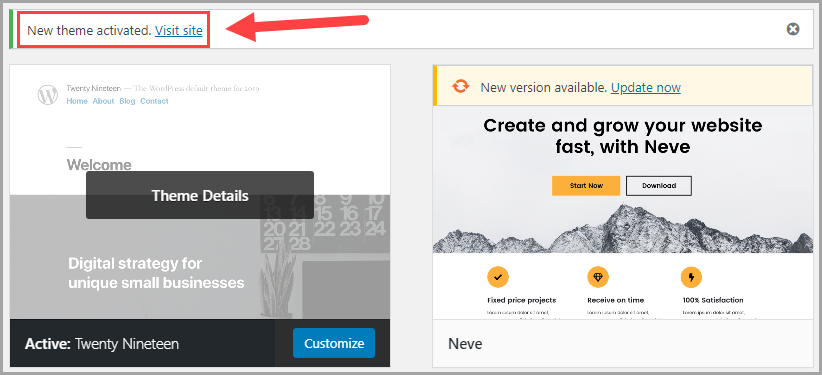
Step 5: Activate Your Theme

Activate Hover over the theme you just installed and click on activate.


Result: Your Theme Is Now Active
You have now learned how to successfully install a free theme from the repository, but what if you have purchased a premium one?
How To Install A Premium Theme Using The Upload Method
Installing a premium theme is similar to the method you just learned, but instead of searching for one from the repo, you will be uploading a zip file, all within your dashboard.
There are many places to secure high quality WP Themes; one place that comes to mind is Theme Forest.
Once you have purchased your desired theme and downloaded it to your hard drive you are ready to begin.
The Upload Method
Hover over appearance >> themes and click “add new” and then “upload theme.
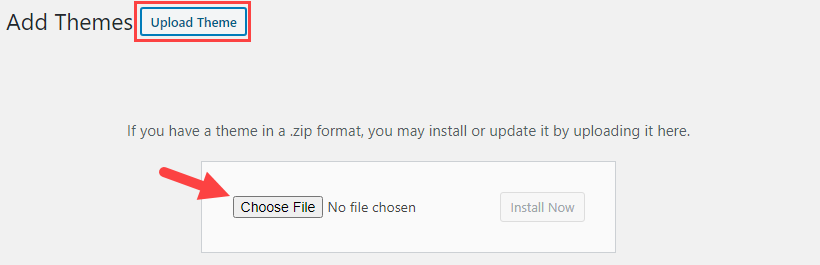
Click “choose file” and search for the zip file on your hard drive. Select it by double clicking it. Once you have uploaded the zip file, click install & activate.
Install A Theme Using FTP (5 Steps)
You will rarely need to use this method, if at all, but if for some reason you can not install via the first two methods you can always connect via FTP and upload files using file transfer protocol.
This is definitely more difficult but not impossible.
Step 1: Download An FTP Client
First, you will need to download an FTP client. Luckily, there is an opensource FTP client called Filezilla.
The FileZilla Client not only supports FTP, but also FTP over TLS (FTPS) and SFTP. It is open source software distributed free of charge under the terms of the GNU General Public License.
Install Filezilla.
Step 2: Create Your FTP Credentials
Depending on your host, a set of FTP or SFTP credentials may already be created for you. If not, you can create your own. For this example I will be using Siteground to demonstrate how to do this.
Siteground uses their own control panel rather than cPanel, as do most managed WordPress hosts.
If your host uses cPanel, simply type “FTP” in the search bar and click on it. The instructions below will be similar so you can still follow along.
Creating Credentials in Siteground
Login to Siteground and navigate to site tools.
Open the hamburger menu and navigate to Site > FTP. This will bring up a screen similar to the one below.
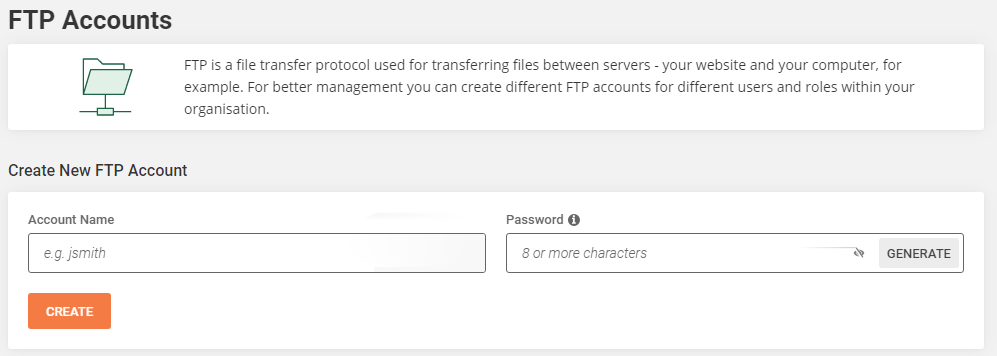
Set an account name and password and click on create. You can use the generate button to create a secure password.
Take note of the password for later use. I use a password manager called Roboform, but you can simply copy and paste it into notepad.
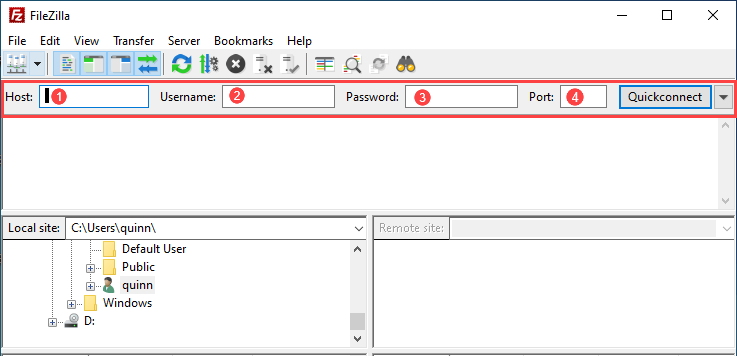
You will need 4 pieces of information to login via FTP; hostname, username, password and port.
You can find this information by scrolling down to manage FTP accounts and clicking on the 3 dots under actions.

Click on the 3 dots and select FTP Credentials.
A popup will appear with the following information:
- Host
- Username
- Password
- Port
This is all the information you will need. Copy all of it and set it aside in notepad. We will need it to login to your site via Filezilla.
Step 3: Login to Filezilla
Now that you have all of the required information, open filezilla and login with the credentials you set aside in notepad.
Once you have entered all of the required information, click the quick connect button.
Your site is now connected using File Transfer Protocol. You will notice all of your local files (files from your computer’s hard drive) will be on the left and all of your site files on the right as shown in the image below.
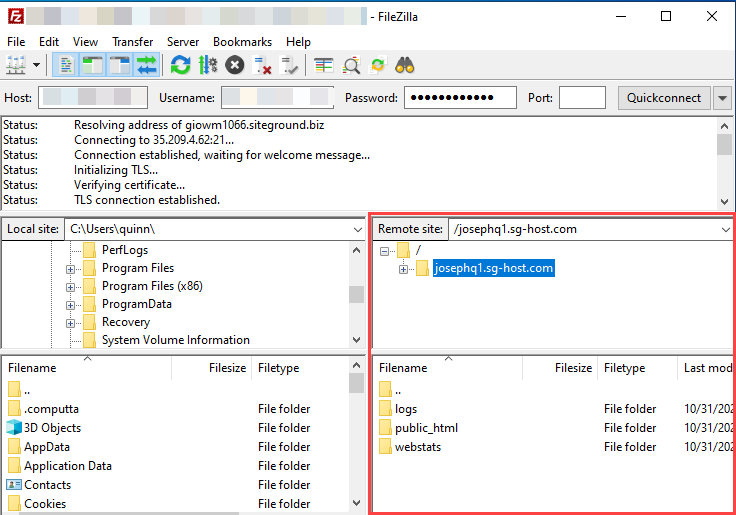
All that is left to do is to upload to your server.
Step 4: Uploading To Your Server Via FileZilla
Find the theme you want to upload on your hard drive and unzip the file.
On a windows computer, open file explorer and navigate to where you saved the file. Select it, right click and extract. There is a similar process for you Mac users.
Open Filezilla (your FTP client) and connect to your site if you are not already.
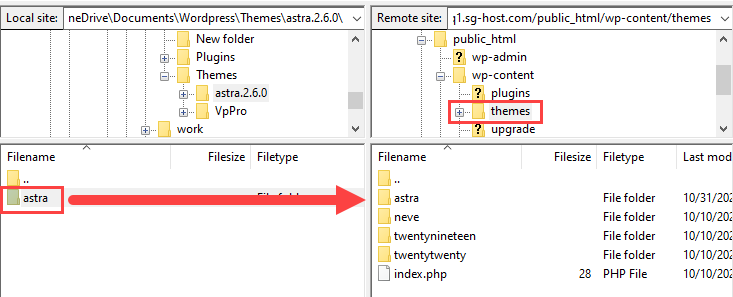
Navigate to your theme folder by clicking on public_html > wp-content > themes.
Locate the new one you downloaded to your hard drive by navigating through your local files. The local files are the ones on the left hand side of the FileZilla interface.
Once you have found it, drag and drop the folder into your themes folder. This will copy all of the theme files from your hard drive to your server.
Now that you have uploaded your theme, all there is left to do is to activate it.
Step 5: Activating Your Theme
To activate, simply login to your WordPress dashboard and navigate to appearance > themes.
You will now see the theme you just uploaded via File Transfer Protocol. Hover over it and click activate.
Conclusion
You have now learned several ways to install a WordPress theme for both free and paid themes.
FAQs About WordPress Themes
Q: How many can I use?
A: You can install as many themes on your site as you like but you can only have one active WordPress theme per installation.
When you activate one theme, you automatically deactivate the theme you previously had active.
Q: What is a child theme?
A: A child theme is an add-on for your existing WordPress theme.
A child theme, as defined by the WordPress Codex, is a theme that “inherits the functionality and styling of its parent.” Child themes are recommended to modify existing themes while still maintaining their design and code.
Q: How can I find out which theme a site is using?
A: If you come across a site with a design that you like and would like to find out which theme and plugins they are using you can providing they are running WordPress.
Simply copy the URL, visit whatWPthemeIsthat, paste in the URL and search. This will return the theme and a list of plugins the site is running.