Over the last few years Google and other industry giants have been pushing to make the web safer by forcing webmasters to secure their site. To do this you must install an SSL certificate.
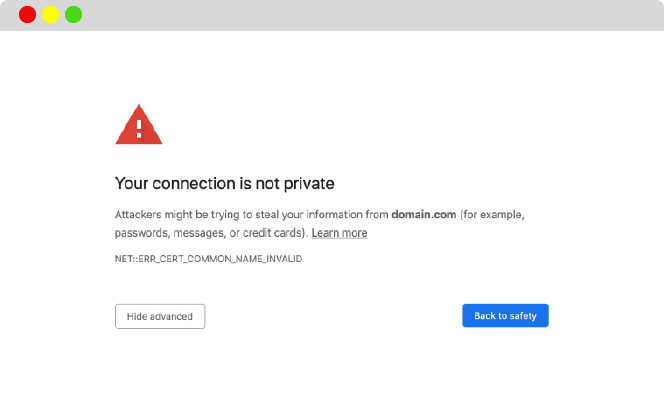
Visitors trying to view an insecure site may end up seeing a warning from Google alerting them that the site is unsafe (see image below).
This essentially makes it mandatory to have regardless if you are processing payments or not. Fortunately, this is easily fixed by installing an SSL certificate.
Benefits Of A Secure Website
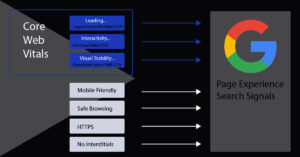
SEO Benefit: Major search engines like Google give preference to sites that have SSL enabled and can provide a slight boost in rankings. It is also one of several page experience signals.
You can read about this in our post explaining core web vitals.
Data Encryption: Data transmission between server and browser are securely encrypted thus avoiding any data hijacks in-between the transmission (i.e personal information, credit card information).
What is an SSL/TLS Certificate
Now that you know the benefits of a secure website, let’s discuss what an SSL certificate is. Very simply, SSL stands for Secure Sockets Layer and encrypts all communication from the server to the browser.
This protocol has actually been depreciated for TLS (Transport Security Layer); a modern security protocol that encrypts data end to end. The SSL protocol is no longer used but is still often referred to as such.
It’s important to note that not all certificates are the same and they vary in cost.
Different Types
There are 3 different types; domain validated (DV), organization validated (OV), and extended validated (EV).
Domain Validated are the most basic and offer the lowest level of assurance, but they are also the cheapest. They are issued in minutes and only need the domain to be validated. These are represented by a grey padlock icon in the address bar of your browser.
These are suitable for individual bloggers and website owners. (recommended)
Organization Validated requires you verify both your domain and your organization’s identity. These aren’t very popular because they are more expensive and are still represented the same way; a grey padlock.
Extended Validated offer the greatest level of assurance and you are required to verify domain ownership along with personal and organizational information. These certificates are represented by the green padlock along with the organization’s name.
These are most suitable for ecommerce sites.
How much does it cost?
As we mentioned above, for individual bloggers and website owners DV certs are a suitable solution. They can often be obtained for free. Many managed WordPress hosting companies have partnered with Let’s Encrypt to offer them as part of their hosting service.
If you use either Siteground or Flywheel, our recommended hosting companies, this will be provided to you free of cost.
If you are using a host that doesn’t offer this as part of their package, you can simply purchase one from a certificate authority (CA) or domain name registrar like Namecheap. They offer domain validated certificates for $8.88 per year and as low as $5.88 for 5 years.
Follow their instructions for installation if you decide to purchase one.
Another option would be to migrate your website to a host that does offer this as part of their hosting package. You can migrate to one of the hosts mentioned above or another on the following list.
A full list of hosting companies that offer free certificates through Let’s Encrypt
There is also a plugin that will generate a free Let’s Encrypt SSL certificate for your WordPress site and force SSL/HTTPS sitewide, fixing insecure content & mixed content issues easily.
Generate A Certificate Using A Plugin
WP Encryption makes generating and installing an SSL certificate on a WordPress site easy and only takes a couple minutes. Install the plugin and watch the video below for directions on generating and installing the cert in cPanel.
This plugin registers your site, verifies your domain and generates an SSL certificate for your website in a couple of clicks without any technical skills normally required.
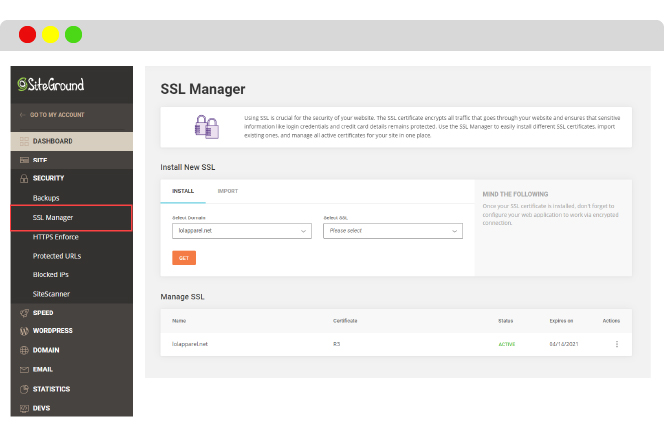
Install An SSL Certificate In Siteground
If you have Siteground as your host, it’s even easier. You will not even need a plugin. Login to My Siteground and navigate to “Site Tools”.
Select “SSL Manager” from the left hand navigation under the security tab. You will see a screen similar to the one below.
Your domain will be selected by default. Select the type of SSL certificate from the dropdown. Your options are Let’s Encrypt, Let’s Encrypt Wildcard, and Premium Wildcard. The first two options are free.
Let’s Encrypt wildcard will secure your domain and all subdomains with one certificate. If you have any subdomains, wildcard would be your best option.
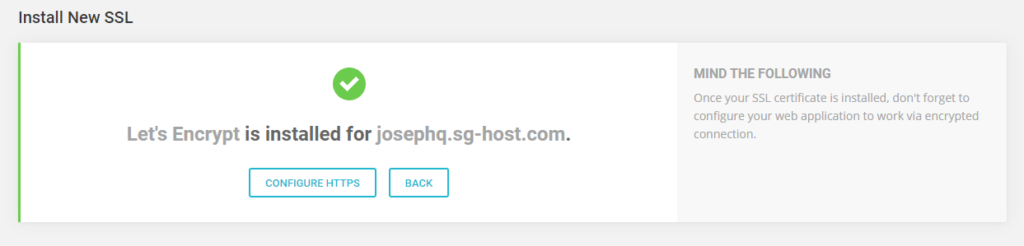
Select your desired certificate and click the “Get” button. This will generate and install the certificate on your server. It takes a few minutes to process the request at which time you will see a success message similar to the one below.
Configure WordPress to Work Through HTTPS
The first thing you need to do is change your WordPress address and site address from http to https in your general settings tab.
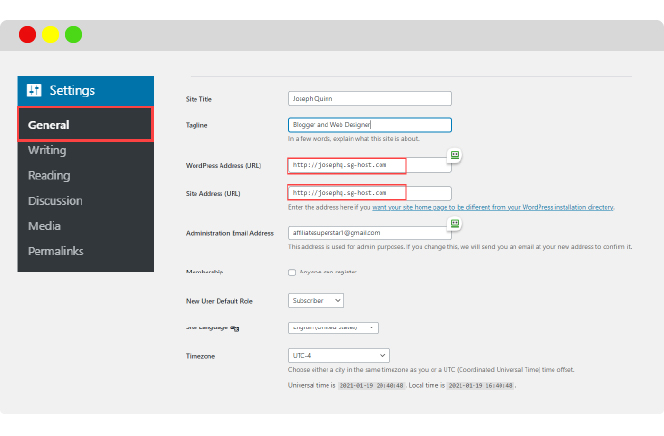
Change your “WordPress Address” and “Site Address” to https and click save. Your site should now be secure and will be indicated by a grey padlock in the address bar.
Note: This will log you out of your WordPress site.
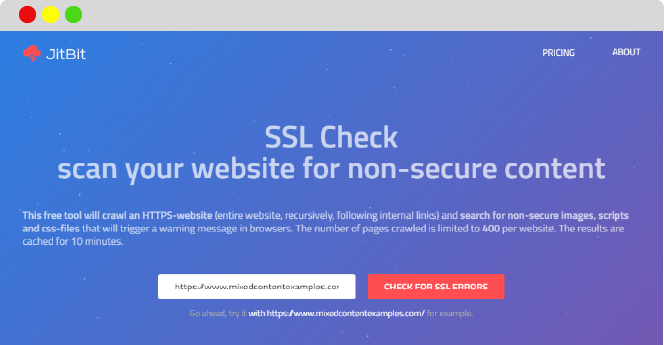
The next step is to test for mixed content using a tool like JitBit to make sure everything is being served via https.
Test Your Site For Insecure Content
Check your site to make sure it’s working properly and for insecure content. You can use a tool like Jitbit SSL to make sure all of your content is being served through a secure protocol.
If your site returns mixed content errors, you will see a list of issues like the image below.
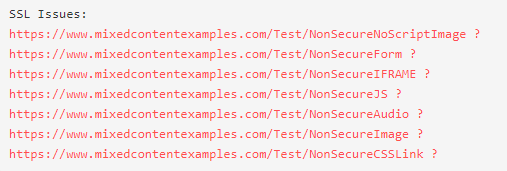
These issues need to be fixed. Luckily, there is a plugin to help; Better Search and Replace.
How To Fix Mixed Content Errors Using Better Search And Replace
Step 1: Install and activate the plugin. Read how to install a WordPress plugin for help.
Once you activate the plugin, navigate to tools > better search and replace. This will bring you to the user interface.
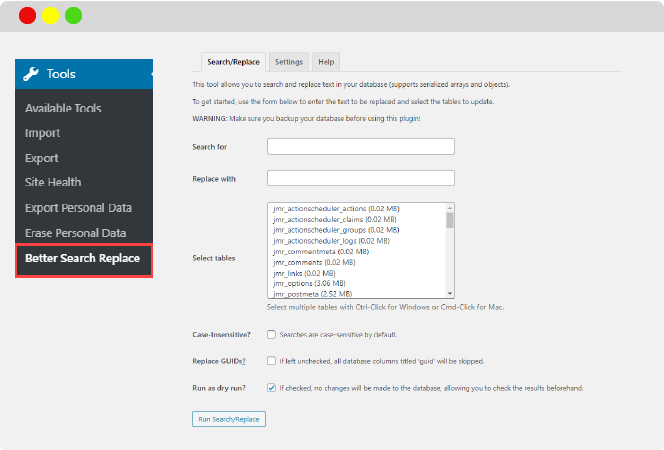
Step 2: Create a backup of your site before you run this tool.
Step 3: Enter your domain name without the trailing slash (http protocol in the search field and https protocol in the replace field).
Step 4: Select all of the database tables
Step 5: Click search and replace button
Note: Checking “dry run” option will check to see if any URLs need to be updated but will not actually replace them.

In the example above, it returned 283 cells that needed to be updated.
Step 6: Uncheck “dry run” and run the search and replace again. This will update all the tables.
Once you’re finished be sure to check your site to make sure it’s working properly.
If something goes wrong, restore your site from the backup you created in step 2 and follow the process again. Make sure you perform every step correctly.
Recap
You have learned how to install an SSL certificate for free, change your site address to a secure protocol (https), and fix insecure content by replacing old URLs with the new secure URLs.
If you have any questions be sure to leave a comment below.


hi, I lost when you mention that”Configure WordPress to Work Through HTTPS”, where is the “general settings tab”?
The general settings tab is in the WordPress dashboard under settings>> general. Login to your WordPress site and scroll down on the menu to settings and select general from the submenu. Sorry I’m just getting back to you, I’ve been really busy with another project in the Crypto space. If you would like to check out the website I’ve been working on you can view it here Coin Harvest